I decided to write a series of posts about one piece of software — Performance Co-Pilot, or PCP for short. (I am aware that the project webpage isn’t the greatest, but don’t let that make you ignore a great piece of software.)
What is PCP
First of all, what is PCP? Let me start by quoting a bit from the PCP webpage:
Performance Co-Pilot (PCP) provides a framework and services to support system-level performance monitoring and management. It presents a unifying abstraction for all of the performance data in a system, and many tools for interrogating, retrieving and processing that data.
If you ever administered a server, you know that there are times when you want to know answers to pretty simple questions: what’s the load average on server X, or what’s the current network utilization on server Y, or memory usage, number of processes, number of logged in users, disk bandwidth usage, filesystem usage, etc., etc. You may have written some scripts that try to answer those questions, or used some of the other monitoring frameworks out there (e.g., Ganglia, Cacti). PCP is rather unique in the way it handles monitoring.

PCP has a three major parts:
- PMDAs
- PMDAs (short for Performance Metrics Domain Agents) are metric collectors. Each PMDA knows how to retrieve certain system information. For example, the Linux PMDA knows how to parse all the information in /proc, the PowerDNS PMDA knows how to get statistics from the PowerDNS daemons, the MySQL PMDA knows how to get stats from MySQL, etc. There are 35 different PMDAs installed that cover various often used daemons and system services — Apache, KVM, lmsensors, memcached, MySQL, Bind, PowerDNS, Postfix, Samba, Sendmail, VmWare, Zimbra, and more.
- PMCD
- PMCD (short for Performance Metric Collector Daemon) is responsible for answering client (see below) requests for metrics, and calls into the various PMDAs to retrieve the requested metrics.
- client software
- The various pieces of client software contact the PMCD (via TCP/IP) and request one or more metrics.
Why not use Ganglia/Cacti/other rrdtool-based software?
As is stated on the rrdtool website, rrdtool is a high performance data logging and graphing system for time series data. So, why not use it? First of all, rrdtool doesn’t collect data; it merely stores it for later retrieval or graphing. This means that if you want to collect data, you still need something to collect it with — a script that parses /proc files and hands the values to rrdtool for storage.
Cacti and Ganglia are just two examples of the many rrdtool-based system logging solutions. Personally, I find them to be a bit too heavy weight (why do I want PHP and MySQL on my logger server?), cumbersome to use (e.g., clunky web interfaces), and just not flexible enough.
Additionally, PCP supports Linux, Solaris, Mac OS X, and even Microsoft Windows. You can use the same tools to monitor your entire network!
Why not use SNMP?
SNMP is a protocol that exposes a hierarchy of variables that often include some performance metrics (e.g., the number of bytes and packets transfered over a network interface). If, however, you want MySQL statistics, you need to write your own stat extractor that feeds it into the SNMP daemon — not very hard, but it still takes some effort.
In this series of posts, I hope to demonstrate to you that PCP is superior to these solutions.
Installation
Debian is my distro of choice, so I’m going to make some Debian-centric assumptions.
On Debian, PCP is packaged so installing it is as easy as:
# aptitude install pcp pcp-gui
Distros that are Debian derivatives (e.g., Ubuntu) should have a package as well. Fedora, RHEL, and SLES have packages as well.
At the end of installation, the Debian package automatically starts the PMCD.
At this point, we only care about the Linux PMDA. By default, anyone that can make a TCP/IP connection to the host can read and write the metrics. (The PMCD has a couple of “metrics” that can be changed — they affect how PMCD behaves.) My suggestion is to set up an access control list. This is what the default config file (/etc/pmcd/pmcd.conf) looks like:
# Performance Metrics Domain Specifications
#
# This file is automatically generated during the build
# Name  Id      IPC     IPC Params      File/Cmd
pmcd	2	dso	pmcd_init	/var/lib/pcp/pmdas/pmcd/pmda_pmcd.so
linux	60	dso	linux_init	/var/lib/pcp/pmdas/linux/pmda_linux.so
mmv	70	dso	mmv_init	/var/lib/pcp/pmdas/mmv/pmda_mmv.so
PMCD allows for a simple access control list in the config file (/etc/pmcd/pmcd.conf), and it would be a good idea to set one up to allow only specific hosts to access it. Here’s an example of what the new config file would look like:
# Performance Metrics Domain Specifications
#
# This file is automatically generated during the build
# Name  Id      IPC     IPC Params      File/Cmd
pmcd	2	dso	pmcd_init	/var/lib/pcp/pmdas/pmcd/pmda_pmcd.so
linux	60	dso	linux_init	/var/lib/pcp/pmdas/linux/pmda_linux.so
mmv	70	dso	mmv_init	/var/lib/pcp/pmdas/mmv/pmda_mmv.so

[access]
allow localhost, 127.0.0.1 : all;
allow 10.1.*, 10.2.* : fetch;
allow home.josefsipek.net : all;
disallow * : all;
It allows reads and writes from localhost and home.josefsipek.net, and only reads from 10.1.* and 10.2.*. You’ll have to restart PCP for the change to take place:
# /etc/init.d/pcp restart
First Test
Now that we have PCP installed and running, let’s query it for the list of metrics. We’ll use the pminfo utility. By default it assumes that we want to query the localhost.
$ pminfo
If you want to query another host, you can specify its name or IP using the -h argument. For example,
$ pminfo -h example.com
On my system it spits out 851 different metrics. Here’s a pruned list that includes the more interesting ones:
kernel.all.nusers
kernel.all.load
kernel.all.cpu.user
kernel.all.cpu.sys
kernel.all.cpu.idle
kernel.percpu.cpu.user
mem.physmem
mem.freemem
network.interface.in.bytes
network.interface.out.bytes
disk.dev.read_bytes
disk.dev.write_bytes
filesys.capacity
filesys.used
proc.nprocs
proc.psinfo.cmd
We can use the -f argument to fetch the current value, and for simplicity, let’s specify the specific metric we are interested in:
$ pminfo -f kernel.all.nusers

kernel.all.nusers
    value 2
So, at the moment, there are two users logged in. Now, let’s check the load average:
$ pminfo -f kernel.all.load

kernel.all.load
    inst [1 or "1 minute"] value 0.0099999998
    inst [5 or "5 minute"] value 0.02
    inst [15 or "15 minute"] value 0
We can see that pminfo returned 3 values — called instances in PCP speak.
I should note that some of the metric values don’t seem to make much sense unless you already know what they represent. Have no fear! pminfo has two arguments that display a short (-t) or a long (-T) help text. For example, the following command will tell us what what kernel.all.load keeps track of.
pminfo -T kernel.all.load
You can use pminfo to fetch all the metrics you want, or you can use one of the other utilities which do some additional magic.
pmdumptext is one such utility. Suppose we want to watch how the disk utilization changes over time. Here’s the command:
$ pmdumptext -mu disk.dev.read_bytes
Time	disk.dev.read_bytes["sda"]	disk.dev.read_bytes["hda"]
none	Kbyte / second	Kbyte / second
Fri Apr  1 16:15:36	?	?
Fri Apr  1 16:15:37	0.000	0.000
Fri Apr  1 16:15:38	248.003	0.000
Fri Apr  1 16:15:39	1748.117	0.000
Fri Apr  1 16:15:40	543.985	0.000
Fri Apr  1 16:15:41	536.041	0.000
Fri Apr  1 16:15:42	331.968	0.000
Fri Apr  1 16:15:43	2299.862	0.000
Fri Apr  1 16:15:44	6112.226	0.000
Fri Apr  1 16:15:45	8187.725	0.000
Fri Apr  1 16:15:46	1212.029	0.000
Fri Apr  1 16:15:47	84.002	0.000
Fri Apr  1 16:15:48	143.990	0.000
Fri Apr  1 16:15:49	963.538	0.000
Fri Apr  1 16:15:50	64.003	0.000
Fri Apr  1 16:15:51	0.000	0.000
Fri Apr  1 16:15:52	0.000	0.000
The first column contains the date and time, the remaining column are the time-converted metrics/instances. That is, between each line of output, PCP calculated the average utilization and printed that out. The arguments (-m and -u) print the first two lines of the output — the name of the metric/instance, and the units. pmdumptext gets the units from the PMCD along with information whether or not it should rate convert the values (it will rate convert “bytes” to “bytes/sec”, but if there is a metric representing the current latency it will leave it alone).
You can change the amount of time between updates with the -t option. As before, you can use -h to specify the hostname. For example:
pmdumptext -mu -t 15sec -h example.com disk.dev.read_bytes
GUI
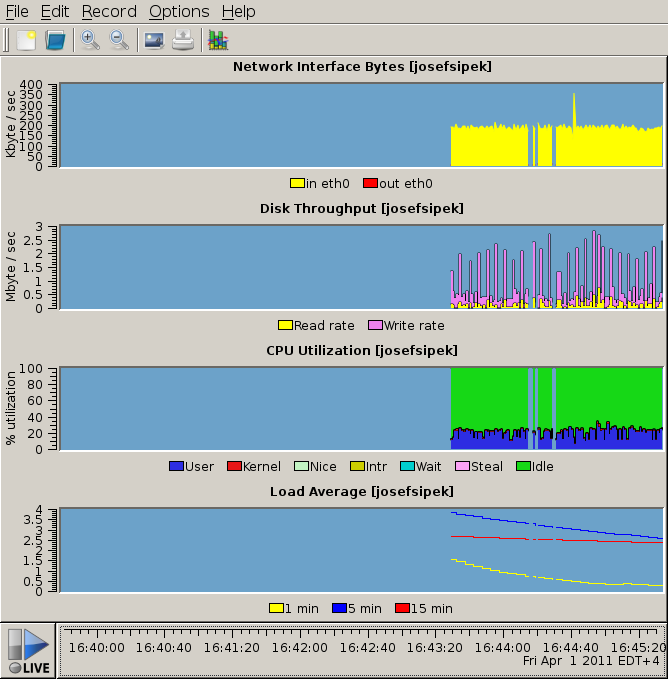
pmdumptext is great, but sometimes you want something more…graphical. Again, there’s a program for that. It’s called pmchart. It’s pretty self-explanatory, so I’ll just show you a screenshot of it in action:
Next time, I’ll cover PCP’s logging facility.