Josef “Jeff” Sipek

Installing Debian under FreeBSD's bhyve

This weekend I tried to move my work dev vm to a slightly beefier vm host. This meant moving the vm from kvm on OmniOS to bhyve on FreeBSD 12.1. After moving the disk images over, I tried to configure vm-bhyve to use them as-is. Unfortunately, grub2-bhyve fails to boot XFS root file systems with CRC support and there was no good way to convert the disk image to get it to boot via UEFI instead (to avoid grub2-bhyve completely). So, I decided to simply reinstall it.

In theory, this shouldn’t have been too difficult since I had the foresight to have /home on a separate virtual disk. In practice, I spent several hours reinstalling Debian Buster over and over, trying to figure out why it’d install and reboot fine, but subsequent boots wouldn’t make it past the EFI firmware.

It turns out that Debian tries to make multi-booting possible and puts its EFI binary into a non-standard location. That combined with bhyve not persisting EFI variables after shutdown results in any boot after the the first poweroff not even trying to look at the Debian-specific path.

This is not a Debian bug, but rather bhyve’s EFI support being incomplete. The easiest way around this is to copy the Debian binary into the standard location immediately after installation. In other words:

# cd /boot/efi/EFI
# mkdir BOOT
# cp debian/grubx64.efi BOOT/bootx64.efi

That’s all that’s needed. The downside to this is that the copy will not get automatically upgraded when grub gets an update.

For completeness, here are the relevant bits of the vm’s config:

loader="uefi"
graphics="yes"
cpu="6"
memory="1G"
network0_type="virtio-net"
network0_switch="public"
zfs_zvol_opts="volblocksize=4096"
disk0_dev="sparse-zvol"
disk0_type="virtio-blk"
disk0_name="disk0"
disk1_dev="sparse-zvol"
disk1_type="virtio-blk"
disk1_name="disk1"

RHEL 5.4: Now shipping XFS

Wow, it’s about time!

Sources tell me that RHEL 5.4 comes with XFS support. This is good news for all those folks wanting to use filesystems larger than 16TB and not trusting ext4 with their data (I couldn’t blame them). As far as I know, these unfortunate souls have been told to use GFS2 if they wanted a RH supported fs that did more than 16TB. (It’s worth mentioning that ext3 had a 8TB limit until about two years ago, when it got fixed up to support whopping 16TB.)

mbox vs. maildir

Over the past two weeks, I decided to try converting some of the mboxes I have for mailing lists to maildirs. Last time I tried to do it, I noticed an unacceptable delay when I started mutt. Not when I tried to load the largest maildir. That made me give up.

For fun (or was it profit? ;) ), I decided to try again. And again, I saw that delay. This time around, I ran strace on mutt, and I found out that my custom .muttrc was making mutt believe that every file in the maildir was an mbox. Fixing up my .muttrc made the delay go away. Now, I have start up times that are the same as with purely mbox setup, but opening up these maildirs takes up WAY less time. I’m talking fraction of second instead of 5-10 seconds.

I’m considering converting all but the spam box to maildir. I really don’t need thousands of extra inodes which I’ll never use anyway, but at the same time, I don’t mind having one gigantic file full of the spam messages (I keep them because I don’t manually check that no good messages got misclassified by spamassassin). I am going to probably tell XFS to reserve some diskspace for it, to prevent lots of fragmentation from the constant open-write-close syscall cycle.

Dumping & restoring XFS volumes

Over the past few years, I’ve been using XFS wherever I could. I never really tried to tweak the mkfs options, and therefore most of my filesystems were quite sub-optimal. I managed to get my hands on an external 500GB disk that I decided to use for all this data shuffling…

320GB external firewire disk

This was probably the most offenseively made fs. Here’s the old info:

meta-data=/dev/sdb1      isize=512    agcount=17, agsize=4724999 blks
         =               sectsz=512   attr=1
data     =               bsize=4096   blocks=78142042, imaxpct=25
         =               sunit=0      swidth=0 blks, unwritten=1
naming   =version 2      bsize=4096  
log      =internal       bsize=4096   blocks=32768, version=2
         =               sectsz=512   sunit=0 blks, lazy-count=0
realtime =none           extsz=65536  blocks=0, rtextents=0

It had 512 byte inodes (instead of the more sane, and default 256 byte inodes) because I was playing around with SELinux when I made this filesystem, and the bigger inodes allow more extended attributes to be stored there — improving performance a whole lot. When I first made the fs, it had 16 allocation groups, but I grew the filesystem about 10GB which were used by a FAT32 partition that I used for Windows ↔ Linux data shuffling. On a simple disk (e.g., not a RAID 5), 4 allocation groups is far more logical then the 17 I had before. Another thing I wanted to use is the lazy-count. That got introduced in 2.6.23, and improved performance when multiple processes were filesystem metadata (create/unlink/mkdir/rmdir). And last, but not least, I wanted to use version 2 inodes.

The simples way to change all the filesystem to use these features is to backup, mkfs, and restore…and that’s what I did.

This is what the fs is like after the whole process (note that isize, agcount, attr, and lazy-count changed):

meta-data=/dev/sdb1      isize=256    agcount=4, agsize=19535511 blks
         =               sectsz=512   attr=2
data     =               bsize=4096   blocks=78142042, imaxpct=25
         =               sunit=0      swidth=0 blks
naming   =version 2      bsize=4096
log      =internal       bsize=4096   blocks=32768, version=2
         =               sectsz=512   sunit=0 blks, lazy-count=1
realtime =none           extsz=4096   blocks=0, rtextents=0

dumping…

I mkfs.xfs’d the 500GB disk, and mounted it on /mnt/dump. Since I like tinkering with storage, I couldn’t help but start blktrace for both of the disks (the one being dumped, and the one storing the dump).

Instead of using rsync, tar, or dd, I went with xfsdump/xfsrestore combo. xfsdump is a lot like tar — it creates a single with with all the data, but unlike tar, it also saves extended attributes, and preserves the hole information for sparse files. So, with blktrace running, it was time to start the dump:

# xfsdump -f /mnt/dump/acomdata_xfs.dump -p 60 -J /mnt/acomdata

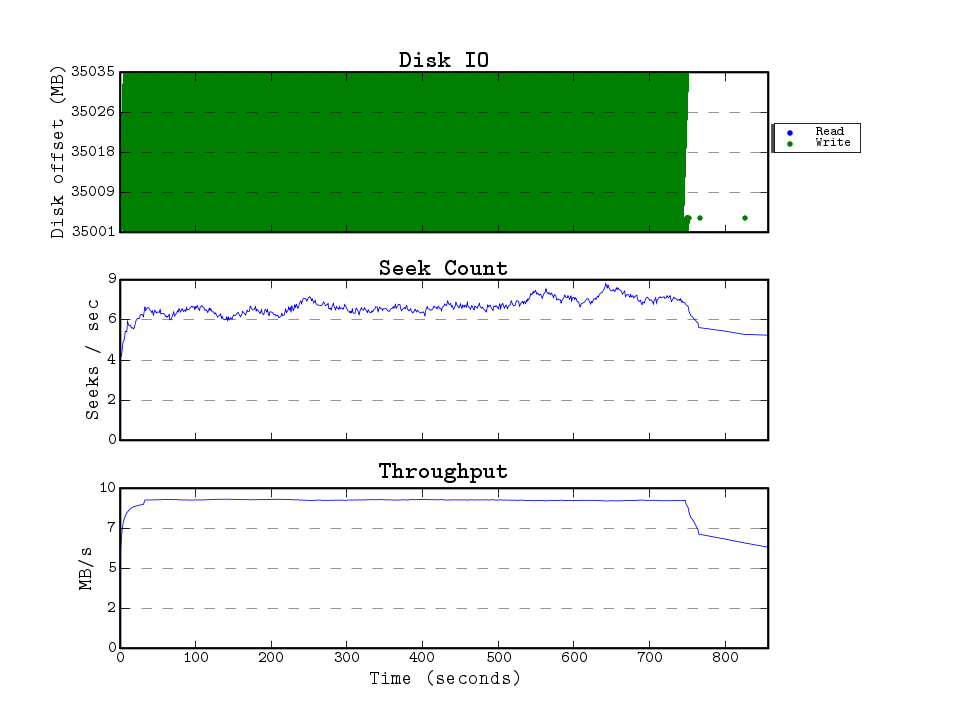
The dump took about 9300 seconds (2 hours, 35 mins). Here are the graphs created by seekwatcher (which uses the blktrace traces)…The source disk is the firewire disk being dumped, and the target disk is the one being dumped to.

source disk

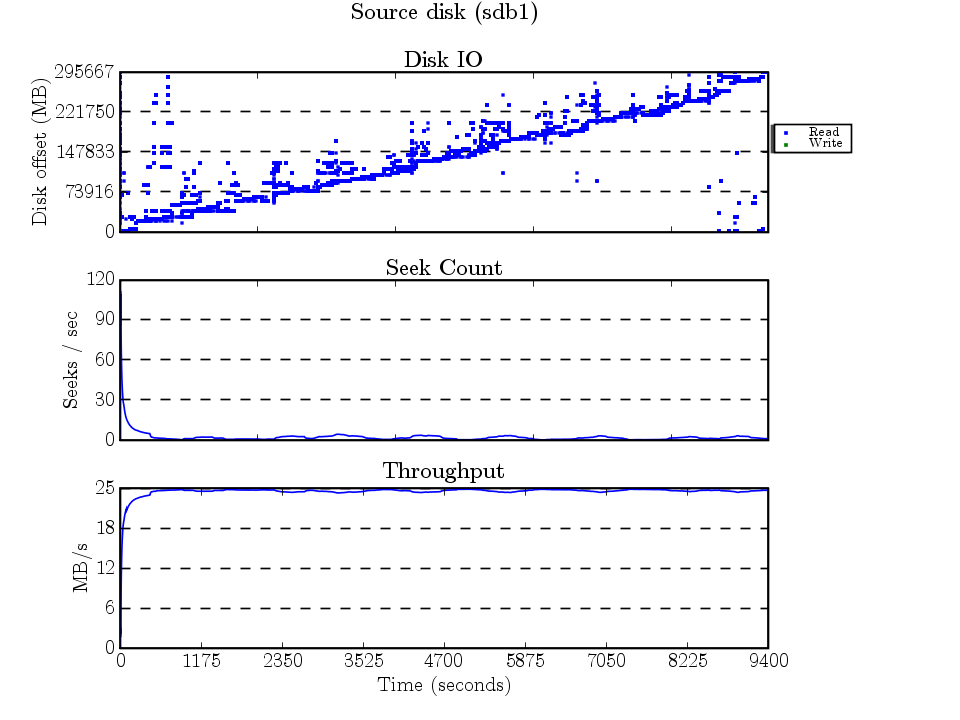
The IO here makes sense, xfsdump scans the entire filesystem — and backs up every inode sorted by the inode number (which is a function of the block number). The scattered accesses are because of fragmented files having data all over the place.

target disk

I’m not quite sure why XFS decided to break the dump file into 8 extents. These extents show up nicely as the 8 ascending lines. The horizontal line ~250GB is the journal being written to. (The seeks/second graph’s y-axis shows that seekwatcher has a bug when there’s very little seeking :) )

…and restoring

After the dump finished, I unmounted the 320GB fs, and ran mkfs on it (lazy-count=1, agcount=4, etc.). Then it was time to mount, start a new blktrace run on the 2 disks, and run xfsrestore — to extract all the files from the dump.

# xfsrestore -f /mnt/dump/acomdata_xfs.dump -p 60 -A -B -J /mnt/acomdata

I used the -A option to NOT restore xattrs as the only xattrs that were on the filesystem were some stray SELinux labels that managed to survive.

The restore took a bit longer…12000 seconds (3 hours, 20 minutes). And here are the traces for the restore:

source disk

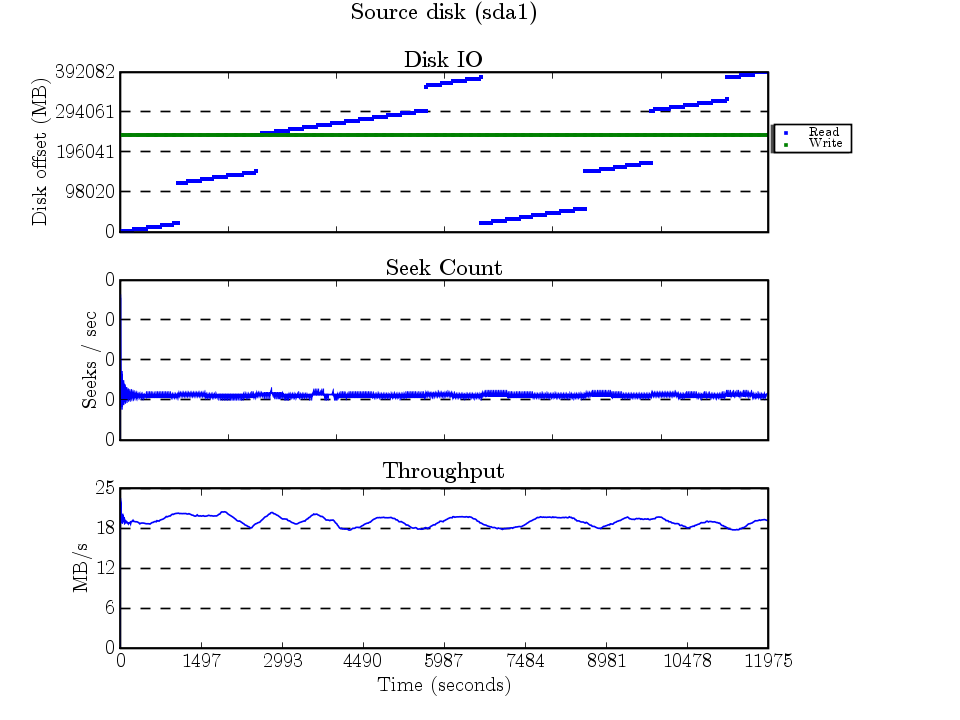
Reading the 240GB file that was in 8 extents created a IO trace that’s pretty self explanatory. The constant writing to the journal was probably because of the inode access time updates. (And again, seekwatcher managed to round the seeks/second y-axis labels.)

target disk

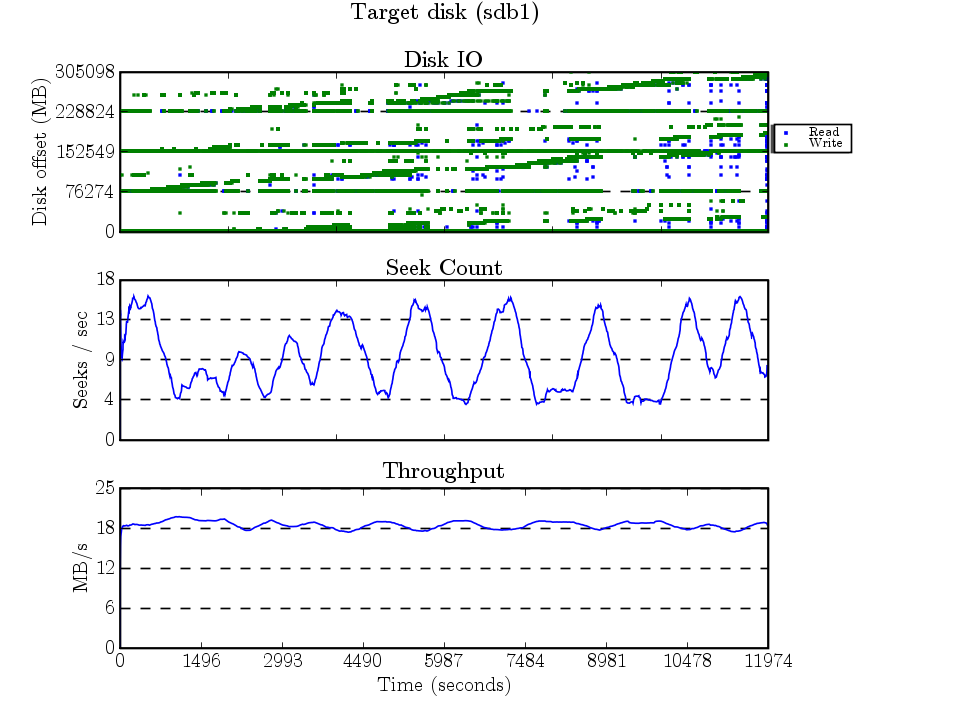
This looks messy, but it actually isn’t bad at all. The 4 horizontal lines that look a lot like journal writes are probably the superblocks being updated to reflect the inode counts (4 allocation groups == 4 sets superblock + ag structures).

some analysis…

After the restore, I ran some debug tools to see how clean the filesystem ended up being…

…fragmentation

37945 extents used, ideal 37298 == not bad at all

…free space fragmentation

   from      to extents  blocks    pct
      1       1      19      19   0.00
      2       3       1       3   0.00
     64     127       2     150   0.00
    128     255       1     134   0.00
    512    1023       1     584   0.00
   4096    8191       1    4682   0.02
  32768   65535       1   36662   0.19
 131072  262143       1  224301   1.16
 262144  524287       3 1315076   6.79
 524288 1048575       2 1469184   7.59
1048576 2097151       4 6524753  33.71
2097152 4194303       4 9780810  50.53

== pretty much sqeaky clean

…per allocation group block usage

/dev/sdb1:
AG     1K-blocks         Used    Available    Use%
  0     78142044     40118136     38023908     51%
  1     78142044     78142040            4     99%
  2     78142044     42565780     35576264     54%
  3     78142036     74316844      3825192     95%
ALL    312568168    235142800     77425368     75%

I’m somewhat surprised that the 2nd and 4th are near full (well, 2nd ag has only 4kB free!), while the 1st and 3rd are only half full. As you can see, the 320GB disk is 75% used.

Bonus features

I decided to render mpeg versions of the IO traces…

source disk (dump) (4MB)
target disk (dump) (2MB)
source disk (restore) (2MB)
target disk (restore) (4.1MB) ← this is the best one of the bunch

XFS, blktrace, seekwatcher

Today I was playing with blktrace, and graphing the results with seekwatcher. At one point, I ran acp (which is a lot like tar, but tries to be smarter) on a directory stored on an XFS volume, but I forgot that months ago, I created a sparse file 101PB (that’s peta) in size. Well, acp was happily reading all the sparse regions. I killed it, and decided to remove the gigantic file which was totally useless. About 30 seconds into the removal, I realized it would have been great to have a trace of that. Well, I started blktrace and about 12 minutes later the rm process finished.

I graphed it and here’s the result (click for larger version):

XFS removing a large sparse file

At first I was very confused why things looked the way they did, but eventually it dawned on me (after some discussion with Dave Chinner — XFS dude) that it’s all journal log traffic. I quickly ran xfs_info on the filesystem:

meta-data=/dev/sdb1              isize=256    agcount=16, agsize=1120031 blks
         =                       sectsz=512   attr=1
data     =                       bsize=4096   blocks=17920496, imaxpct=25
         =                       sunit=0      swidth=0 blks, unwritten=1
naming   =version 2              bsize=4096
log      =internal               bsize=4096   blocks=8750, version=1
         =                       sectsz=512   sunit=0 blks
realtime =none                   extsz=65536  blocks=0, rtextents=0

And things just made sense. I calculated the size of the log (see bolded numbers) to be (4096*8750) bytes, or 34.17 MB (base 2) or 35.84 MB (base 10). If you look at the graph, you’ll see that the disk offsets accessed were 35001 to 35035 MB or about 35MB! XFS puts the log near the middle of the disk to minimize seeks as much as possible, so as you may have guessed, my disk is about 70GB in size (it’s a U160 73GB SCSI disk).

XFS & ext3

So, here’s a mini-rant…There are just as many XFS complaints as ext3 complaints on the linux-kernel mailing list. Yep. It is that simple. I can’t stand the fact that some people make a big deal out of complaints about XFS, but are oddly silent (or ignorant?) of the fact that there are just as many “problems” with Ext2/3. I’m not even considering Ext4, as it is in development.

XFS, ext3 and 16TB

So, I was in #linuxfs on OFTC, and a whole discussion happened about XFS and ext3. Eric Sandeen was working on fixing up few bugs in ext3 to make it work on 16TB of storage. I couldn’t help but mention XFS. The discussion then evolved into XFS is a large pile of code that is really nasty in places (I do agree with that) but it still performs very well. Eric pasted a link to this image (I copied it for archival purposes.) which shows the code size of XFS over time. It is actually kind of scary.

XFS code size

Yet Another Box Using XFS

Finally! Approximately 28 hours after I started I finally got my laptop’s root filesystem to be XFS. Yay! Here’s a quick summary of what I did:

  1. boot with init=/bin/bash
  2. make sure that / is mounted read-only
  3. mount my external firewire drive read-write
  4. use dd to copy the entire root partition to a file on the external disk
  5. run sha1sum on the disk image and the partition (just to make sure that I got everything exactly the way it is)
  6. reboot into knoppix/other live CD (I happened to have a copy of SLAX)
  7. mkfs.xfs the partition
  8. mount the partition, and the disk image (using -o loop=/dev/loop9)
  9. cp -a the files from the disk image to the partition
  10. chroot to the new partition
  11. edit /etc/fstab to reflect new filesystem type
  12. run grub to install the new stage 1.5
  13. reboot, and enjoy the new filesystem

It is rather simple procedure. The thing that made it take so long (instead of ~3-4 hours) was the fact that GRUB didn’t want to work. It took me more than a day to figure out that downgrading grub to 0.91-2 would do the trick.

Powered by blahgd