Josef “Jeff” Sipek

End-Fed Half-Wave & 49:1 Unun

I am a happy user of 1/4 wave verticals and hamsticks, but I’ve been thinking that I should look into another antenna type to add to my bag of tricks when I go out to do a POTA/WWFF activation. The hamsticks are easy to set up and completely avoid dealing with people tripping over wires, but they aren’t as good as full-sized antennas. On the other end of the spectrum, 1/4 wave verticals work really well, but the radial field needs quite a bit of space and curious passers-by have a tendency to walk right through it.

For a long while, I was contemplating building a end-fed half-wave antenna. The draw with this type of antenna is that it has a minimal ground footprint, but it is still a full-sized antenna, so it should perform well.

Before I go any further, I should say that there is a difference between end-fed half-wave and random-wire antennas. End-fed half-waves, as the name suggests, are exactly half a wavelength long. In theory, the feed point has an infinite impedance, but in practice it is between 3 and 4kΩ. As a result, they are often fed with a 49:1 or 64:1 unun which transforms the 50Ω coax feedline impedance to about 2.5–3.2kΩ. Because the impedance is so close, it is possible to use these antennas without a tuner. Random wire antennas are also end-fed, but their length is specifically chosen to be not resonant. They are often fed with a 9:1 unun and require a tuner.

Gathering Info

Before I ordered the parts to build my antenna (or to be more accurate, the 49:1 unun), I looked for information about this type of antenna.

I found K1RF’s slides from 2018 titled The End-Fed Half-Wave Antenna. They seem to cover pretty much everything I wanted to know about the design—namely the ferrite toroid sizing, capacitor specs, and so on.

As far as what to expect from the mechanical build, I drew inspiration from KM1NDY’s DIY 49:1 Unun Impedance Transformer For End-Fed Half Wave (EFWH) Antenna (Step-by-Step Instructions) blog post.

Bill of Materials

I ordered the items I was missing from Mouser. I could have probably saved a few dollars by hunting around on eBay, but I like the idea of receiving what I wanted instead of mis-advertised garbage…and I was going to place an order with them anyway for one of my other hobbies.

Using K1RF’s summary table (see slide 25), I targeted something between “QRP” and “QRP Plus” to make it somewhat portable. I tend to run 50-66W SSB and 15-25W digital, which is certainly on the upper end of the approximate power rating from that slide.

Namely, I went with two T140-43 toroids, 21:3 turns of #20 magnet wire, and 100pF 3kV capacitor. I used #20 magnet wire simply because I already had a spool.

Here’s the list of items for my build including prices (some of which I estimated):

Item Qty Price
Ferrite T140-43 $2.94 2x $5.88
Capacitor 100pF 3kV $0.22 1x $0.22
Type-N connector $8.02 1x $8.02
Magnet wire #20 ~9’ ~$1
Assorted screws, nuts, and washers ~$2
“Project box” free
Total ~$17

For comparison, a similarly sized commercially produced 49:1 unun will easily cost between $30 and $60.

I used my favorite source for project boxes—a nearby restaurant. Many restaurants use various plastic boxes for take out orders. I love using these for various projects. Since they don’t cost me anything, I don’t care if I break it during construction or scrape it up during subsequent use.

(And yes, I’m aware, type-N connectors aren’t necessary for HF. I standardized on them to allow me to use the same coaxes for whatever band I wish without having to worry about adapters or losses.)

Bench Testing

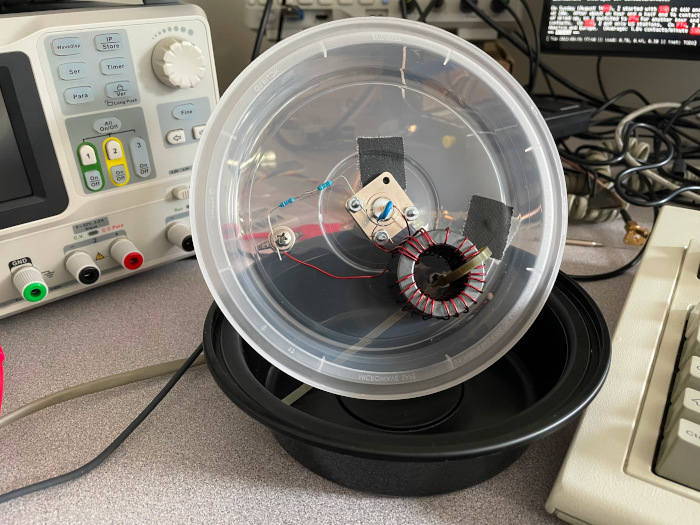
After the build was done, I soldered a 2.2kΩ and a 1kΩ resistor in series to use as a 1/4W dummy load for the NanoVNA. I didn’t bother doing anything fancy with the “dummy load”. I simply let it rest between the antenna terminal and the ground on the connector:

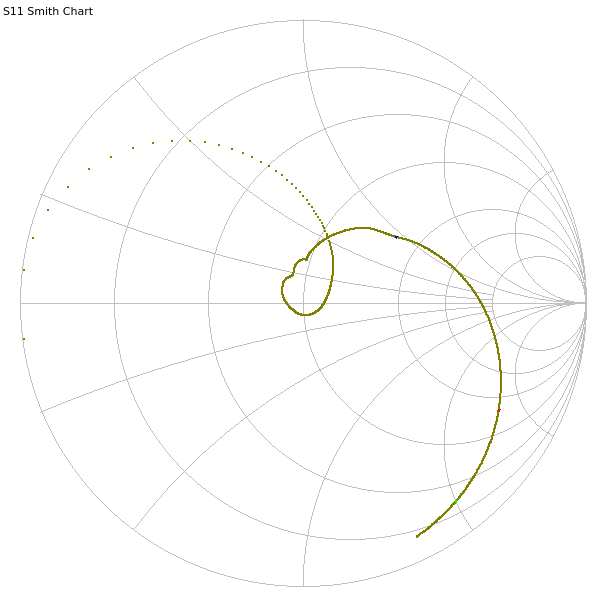
Anyway, here’s the VNA sweep from 1 MHz to 30 MHz:
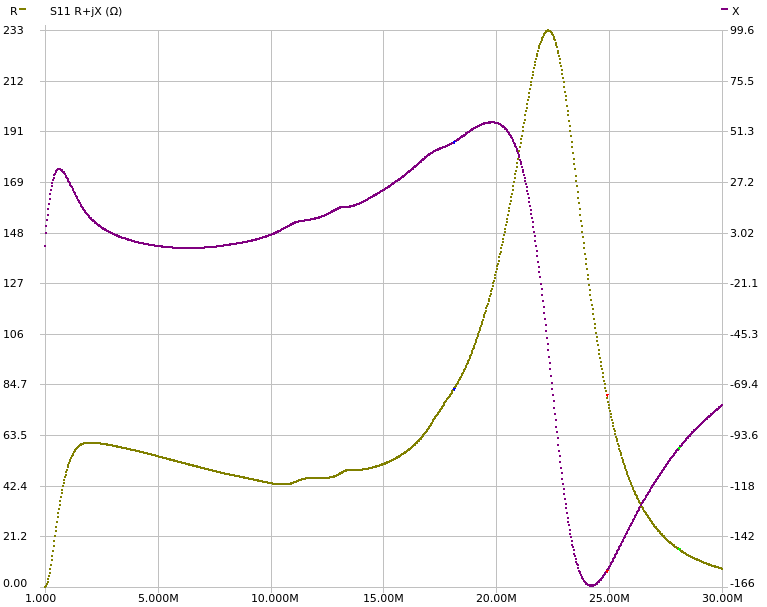
Here is the complex impedance in rectangular coordinates:
Finally, the SWR is at its lowest (1.085:1) at 7.55 MHz. (Note the different x-axis range.)
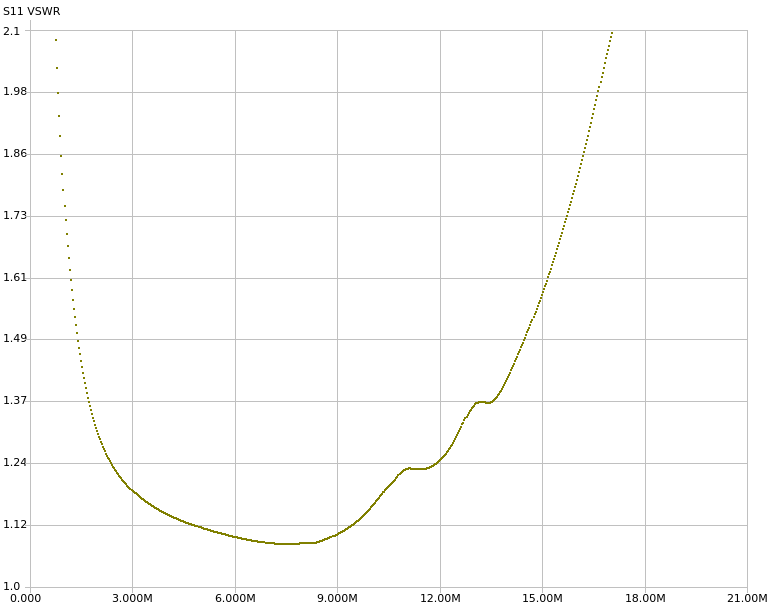
Not perfect, but certainly quite usable. And for those that prefer, here’s a table with various amateur radio HF bands:

Band Freq (MHz) SWR Z (Ω) Usable?
160m 1.9 1.321:1 60.4+j11.3 yes
80m 3.6 1.159:1 58-j0.03 yes
60m 5.3 1.111:1 54-j3.77 yes
40m 7.1 1.086:1 49.5-j4.08 yes
30m 10.1 1.166:1 43.3+j2.41 yes
20m 14.1 1.428:1 49.2+j17.7 yes
17m 18.1 2.345:1 82.6+j46.1 yes
15m 21.1 3.895:1 187+j35.6 maybe
12m 24.9 8.341:1 80.5-j158 no
10m 28.1 16.110:1 15.7-j99.7 no

Of course, this is with the 3.2kΩ dummy load. The impedances may be completely different with an actual antenna connected.

I mentioned that I went with smaller toroids to make it more portable. The whole unun weighs 161 g (that’s 5.7 funny units, or 0.36 bigger funny units).
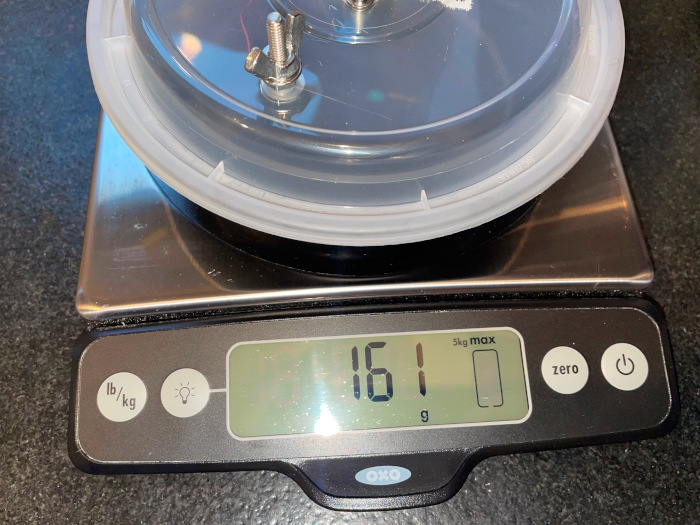
Not super light, but it would have been much worse with 2.4" T240-43 toroids which weigh more than three times as much (106g vs. 33g per toroid).

On-Air Testing

No matter how nice the results of a bench test are, they are irrelevant. What actually matters is on-air performance. So, I packed up my FT-991A, the new unun, and the 40m 1/4 wave antenna’s radiating element (1/4 wave for 40m is the same as 1/2 for 20m) and headed to a nearby park.

I did this two days in a row.

On Saturday (August 13th), I went exclusively with FT4 running 20W. I spent about 1 hour and 12 minutes on-air and got 50 contacts all over Europe, some in North America, and a handful in South America and Africa. A very good activation! (Average: 0.7 contacts/minute)

On Sunday (August 14th), I started with SSB at 66W and later moved to FT4 at 20W. After about an hour and a half and 96 contacts, the SSB pileup kind of dried up, so I switched to FT4 for another hour and a half and another 44 contacts. On SSB, I got only US stations. On FT4, I had a mix of North America and Europe. (Average: 1.04 contacts/minute SSB, 0.5 contacts/min FT4)

Both days, I had the antenna set up as a sloper with the feedpoint (and therefore the unun) about 2 m above ground fed through 100’ of off-brand LMR-240-UF. I know that the repurposed radiating element is too long, but I’ve been too lazy to try to trim it better since the FT-991A’s tuner handles it just fine. The 100’ of coax is completely silly and 20’ would do, but I didn’t have a shorter one handy. The datasheet says that there is 1.60dB loss per 100’ at 30MHz.

With that said, here’s what the NanoVNA showed for the 20m band:
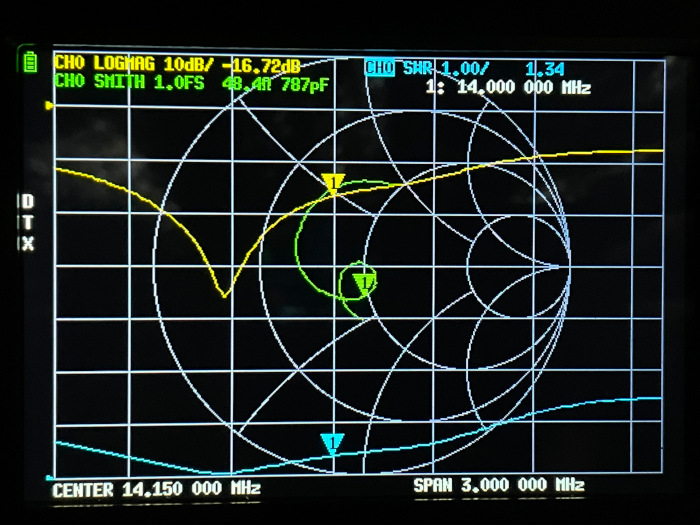
The bottom of the band has SWR of 1.34:1 and the top of the band 1.50:1. The minimum of 1.03:1 is at 13.470 MHz.

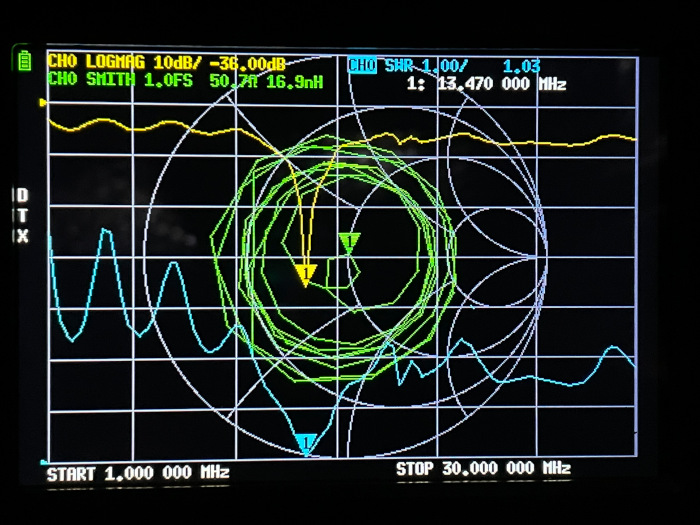
For completeness, here’s the 1–30 MHz sweep:
Future Work

Even though I’ve only used the unun for little over 4 hours, I already started collecting todo items for what to check or build next. For example:

  • Check the unun temperature after transmitting.
  • Possibly move the unun “guts” into a smaller/better box.
  • Try making a 64:1 unun (with 24:3 turns) and compare it to this one.
  • Consider rebuilding it with a larger gauge magnet wire.
  • Cut longer antenna elements and give them a try. Definitely try 80m.

For about $17, I’m very happy with it so far.
BCRA Fox Hunts (2021)

This post is about two of the Wikipedia article: fox hunts organized by the Bristol County Repeater Association in 2021. (Information about the last/next fox hunting event.)

July 31st, 2021

This was my first fox hunt of any kind. To improve the chances of success I teamed up with KM1NDY and AA1F. They participated in at least one BCRA fox hunt before, so they knew what to expect. (You can read KM1NDY’s thoughts about the hunt on her blog.)

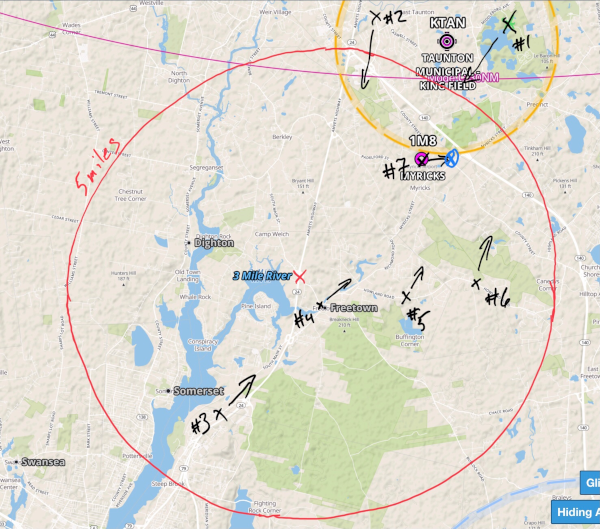
The “parameters” of the hunt were simple: find the transmitter transmitting every 5 minutes from somewhere within 5 miles of exit 13 on MA 24.

Everyone likes to talk about gear, but at least in my opinion it is much more important to have a good strategy than to invest in specialized gear. That idea, combined with not knowing whether I’d like fox hunting or not, meant that I was going to use what I already owned. That meant WA5VJB’s cheap yagi and an Alinco DJ-G7 handheld. As far as non-radio gear is concerned, I brought my iPad to use for an annotated map.

I already talked about the antenna in my ARRL June VHF contest writeup, so I won’t repeat myself here. I got the Alinco handheld because I wanted a handheld with a third band. That narrowed my options down a lot. Since I heard good things about the Alinco and having a 1.2 GHz capability seemed cool, I went with it, even though the Boston area doesn’t have any sort of 1.2 GHz activity.

We decided to meet up at Wikipedia article: Massasoit State Park. That made it easy for me to do a POTA/WWFF activation after the hunt.

My co-conspirators were running a bit late, so I got to make the first “measurement” from the park parking lot alone. You can see it on the map labeled as #1:

As you can see, I went relatively low-tech on the map annotation. I just took a screenshot of a reasonably zoomed map and hand-drew the 5 mile circle. Then, during the hunt itself, I just eyeballed the direction of each measurement and noted it down.

When KM1NDY and AA1F arrived at the park, I shared with them my measurement. After a brief discussion about where to go next, I hopped into their car and we headed west to get back to the highway.

I won’t bore you with turn by turn retelling of the whole trip. I will, however, mention a few observations. In no particular order:

  1. Even the eyeballed arrows on the map are more than sufficient to get an idea where the transmitter is.
  2. The built-in attenuation in the Alinco handheld is super convenient, and pretty much all that I needed.
  3. Knowing the fox can help a ton—E.g., Skip (KB1CNB), acting as the fox, is known to like coffee shop parking lots, so looking there first is wise.

October 23rd, 2021

Between this and the previous BCRA fox hunt, I got a chance to do some on-foot fox hunting thanks to K1MJC who hid a fox several times in nearby Wikipedia article: Waltham. This time, I decided to try the hunt by myself (well, with Holly) and left KM1NDY and AA1F to fend for themselves—or “once our partner and now our competitor” as KM1NDY put it in her writeup.

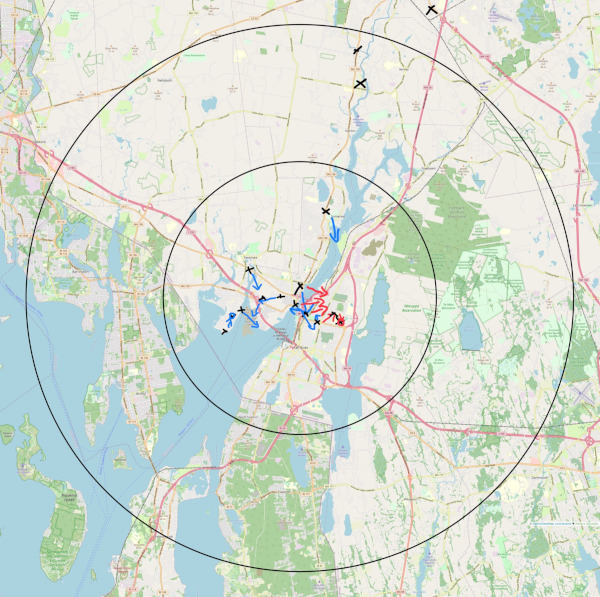
This was a bigger hunt. The radius was 10 miles centered on the Veterans Memorial Bridge in Fall River and there were two transmitters!

Given the size, I decided to make a better blank map. I stitched together a couple of screenshots and then drew 5 mile and 10 mile circles. This turned out to be mostly useless since both foxes were within the 5 mile circle and we hadn’t even picked them up before entering the inner circle. Just look at the annotated map:

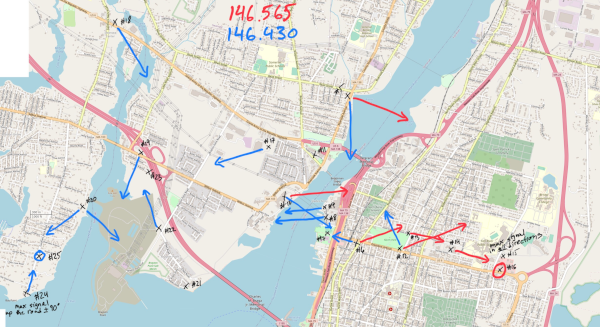
I didn’t even bother to try to capture all the information on this map because of how close everything was. When I got home, I ended up redrawing the map to show all the detail based on the above map, notes I made on the side, and what I remembered.

As you can see, we started off getting measurements for both foxes, but soon afterwards thought that we were relatively close to the blue fox. After driving between the two banks of the river far too many times, we gave up on the blue fox and tried our luck with the red fox.

Hunting the red fox was pretty straightforward, and before long we found Skip (KB1CNB) in his car playing the role of the fox. Skip told us that the other fox (blue on our map) was on the other side of the river. This sort of helped. So, we headed across the river.

Looking at the map now, it is clear which measurements were real and which were erroneous, but it is much harder to sort it all out when you are driving around not knowing where the fox is. :) We got really close at stop #20 where we got two equally promising directions. Sadly, we followed what turned out to be the reflection instead of the real one because we assumed that the blue fox was, much like Skip’s, a car in a parking lot. It wasn’t. The fox was on a step ladder in someone’s yard. We were clued in to this when someone mentioned it on the BCRA repeater.

I should know better, but I’ll promise anyway to write about my fox hunting strategy at some point in the future.

ARRL June VHF Contest & Yagi Build

Last summer I ended up getting licensed as a Wikipedia article: radio amateur. (Yes, it took me 11 months to mention it here.) Since then, I’ve been keeping myself busy trying out various aspects of the hobby. A week and a half ago, I got to combine a few of these aspects and participate in the ARRL June VHF contest. Namely, I wanted to try combining: contesting, roving, operating from a park, and antenna building.

I’ve been meaning to try roving for the past 7 months, but every time there was a good opportunity (in other words a VHF contest), life got in the way and I couldn’t participate.

Since I first got the idea, I’ve emailed with a number of people about a variety of radio-related topics. Speaking specifically of VHF contest roving, WB8LYJ and WW7D provided me with plenty of information. As a matter of fact, they gave me so much roving info I didn’t even use it all—yet. Thank you!

Location Planning

Every rove starts with planning of the route. In order to be a rover, one must make contacts from at least two Wikipedia article: grid squares during the contest. Given that this was going to be my first rove, I decided to do the bare minimum and visit only two grids to get some experience for the next time.

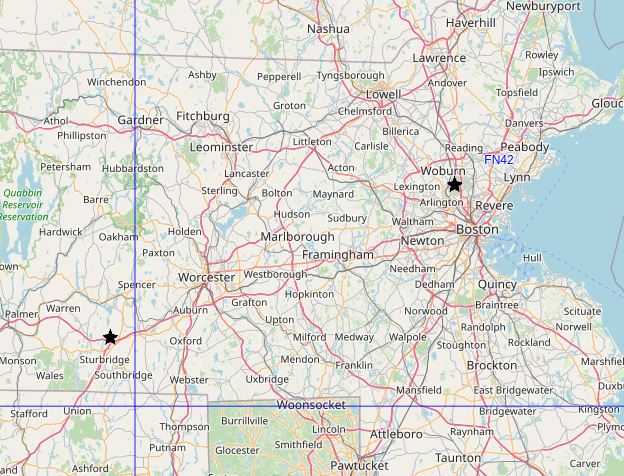
I live in FN42, so I went with a location I knew would work—the Middlesex Fells Reservation. I’ve been there a couple of times, so I knew exactly which hill I wanted to use. This requires a 200 m hike with about 15 m of elevation gain to get to from the parking lot.

Living pretty much in the center of FN42, I have three equally annoying options for the second grid—FN32 to the west, FN43 to the north, and FN41 to the south.

I looked for parks just outside FN42 to operate from and eventually settled on Wells State Park in Sturbridge, MA in FN32.

roving locations

At VHF and UHF frequencies, the elevation of the antennas matters quite a bit, so I was happy to see that Wells State Park has a decent hill—Carpenter’s Rocks. The peak is at about 260 m while the parking lot at the bottom of the park is at 190 m—or about 70 m of elevation gain over 1.1 km of distance. Hiking up the hill with the necessary radio equipment didn’t seem like too crazy of an idea while sitting at my computer.

Finally, both Wells and Middlesex Fells are in the Parks on the Air and World Wide Flora & Fauna databases. Wells is K-2462 and KFF-2462, while Middlesex Fells is K-8414 and KFF-5690, respectively. So, not only do any contacts made there count toward the contest, I can also use them to get credit for activating the parks. (Well, I didn’t realize that Wells was a WWFF park until after the contest.)

To keep the timing simple, I was going to spend Saturday at Wells and Sunday at Middlesex Fells.

Antenna—2 m

The plan for a few months was to build Wikipedia article: yagis for 2 m and 70 cm bands and some (weakly) directional antenna for the 6 m band. Somehow, I ran out of time and only managed to build the 2 m yagi the day of the contest.

I went with WA5VJB’s cheap yagi design. I used a 2 inch by 1 inch wooden furring strip for the boom and 1/8 inch aluminum tubes for the elements.

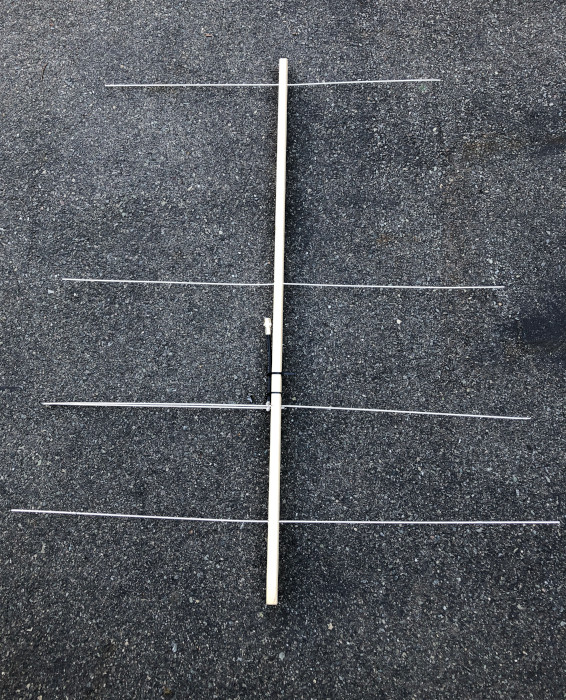
Here’s the antenna after the contest. The elements are beaten up and slightly misaligned.

Beaten up 2m cheap yagi

Boom

I bought an 8 foot long furring strip and cut it in half, which gives plenty of space as the 4-element “cheap yagi” design requires 40.5 inches between the reflector and the second director. I placed the reflector about 5 inches from the end of the boom which leaves enough room to act as a hand grip. This left about 2 inches extra on the other end.

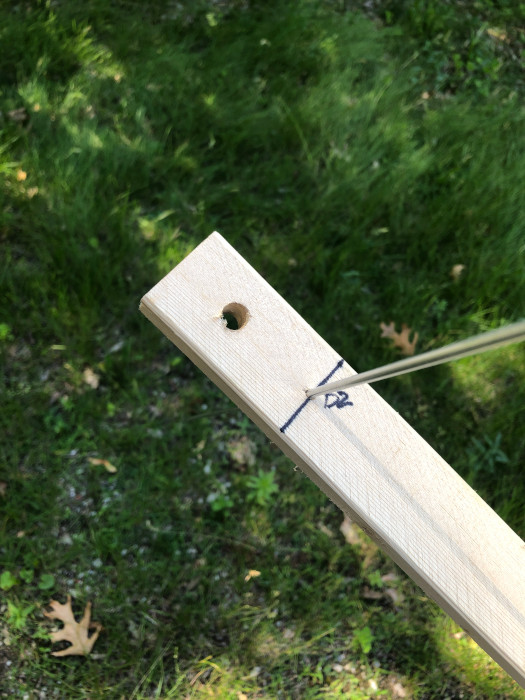
Because I didn’t have time to figure out how to attach it to a mast, I drilled 3/8 inch holes about 1 inch from both ends of the boom to let me suspend it on a rope from a tree branch.

2m cheap yagi mounting holes

Elements

The aluminum tubes I found come in 3 foot sections. Unfortunately, three of the four elements in the design are longer than 3 feet, so I had to splice them together to make the longer lengths.

At the hardware store, I noticed that the 3/32 inch aluminum tube fit nicely (but loosely) inside the 1/8 inch tubes. So, the plan was to use bits of the smaller diameter tube as a stub to hold the sections together.

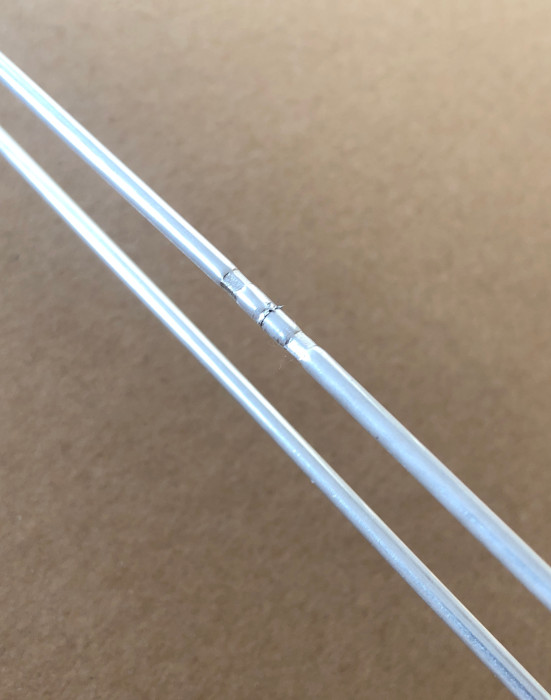
At first, I tried to solder the sections together, but the solder just wasn’t sticking to the aluminum. After nearly giving up on the build, I realized that I can crimp the pieces together. The 0.100 hex die I have for coax crimping works perfectly for this.

So, whenever I needed to do a splice, I’d insert a 1 inch section of the 3/32 inch aluminum tube between the two section of 1/8 inch tube to be joined and I’d crimp each side. This provides decent mechanical and electrical connections.

Completed splice on the driven element:

2m cheap yagi crimp

Fragility

Unfortunately, the aluminum tubes themselves are rather fragile. While carrying the fully built yagi up and down a hill, it was far too easy to bump one of the elements and bend it immediately next to the boom. It didn’t take many bumps for metal fatigue to result in a break. Thankfully, the one and only break happened on the way home. I still had to fix it in order to use the antenna on the second day of the contest.

I would not recommend 1/8 inch aluminum tubes for 2 m yagis. The elements stick out a bit too much. Combine that with the softness of aluminum, and you have an antenna that’ll break far too easily. A yagi for 70 cm might be narrow enough that these aluminum tubes would work well, but I haven’t tried. I plan to repurpose the tubes from this build for a 10-element 1296 MHz yagi. With the widest element being only 4.3 inches, it should be relatively robust. And if one of the elements breaks, it is simple enough to just cut a new one instead of having to splice things back together.

Antenna—6 m

For the 6 m band, I reused my 1/4 wave vertical that I’ve been using for Parks On The Air activations over the past two months. (I plan on making a separate post about my 1/4 wave verticals.)

Antenna—70 cm

I don’t have a dedicated 70 cm antenna. However, I have an Ed Fong DBJ-1, which is a 2 m/70 cm wire Wikipedia article: J-pole antenna. It only really works on the 440-450 MHz part of the band, but it is better than nothing.

Contest Itself

Unsurprisingly, not everything went according to plan.

Suspending the yagi from a branch worked, but it was a bit fiddly. Specifically, it was far too easy to tilt it up or down instead of keeping it level. It was also a bit difficult to aim the antenna in a specific direction since the coax hanging down constantly tried to turn it back to where it started.

Saturday

The contest started at 18:00Z. I planned to leave early enough that I could drive over to Wells State Park, grab all the gear, hike up the hill, set up, test everything, and then have a few minutes to relax before the start.

Well, I ended up leaving late because of last minute antenna building. I planned to leave about two hours before the start of the contest, but managed to leave only 5 minutes before the start.

I arrived at the park, and it became obvious that I wasn’t quite sure how to get to the top of the hill. Instead of roaming aimlessly around the forest with all the gear, I did a quick hike to the top to find a reasonable way. This extra hiking added another 30 minute delay to my start.

When I got back to the car, I grabbed everything and headed up again. The second ascent was much harder because of the ~16 kg (~35 lbs) of radios, coax, battery, water, etc. Having my hands literally full also made it harder to defend myself from mosquitoes on the way up. Thankfully, the top of the hill didn’t have any.

Once back at the top, I took a few minutes to reduce my heart rate and then I started setting up. That’s when I discovered that even though I brought three antennas with me, I hauled only two coaxes up the hill. I left the third (and spare fourth) in the car. There was no way I was going to go back to the car, so I resorted to moving one of the coaxes between the Ed Fong and the 6 m 1/4 wave. During the first coax swap, I realized that I also forgot a coax switch.

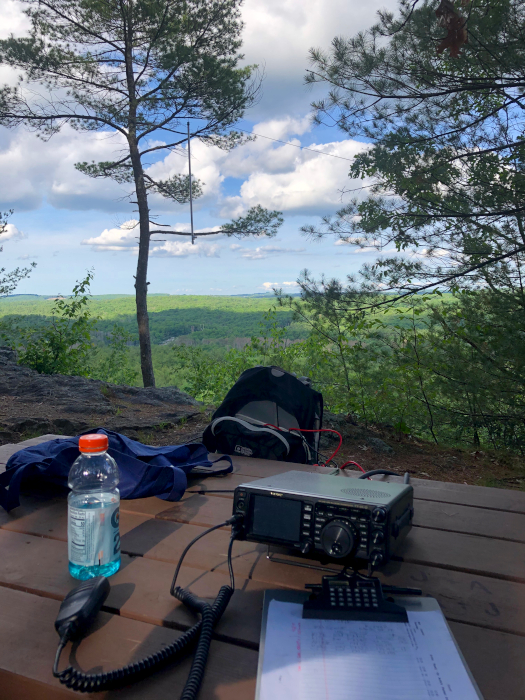
Anyway, at least the view was nice. (You can see the Ed Fong antenna hanging in the tree on the left.)

View from Well State Park

At 00:00Z, about 20 minutes before sunset, I called it a day, packed up, and descended through the mosquito territory once more to get to the car. During the descent, I managed to break off one of the elements on the yagi.

Sunday

The first thing I did Sunday morning was fix the yagi. This took extra effort because the break happened at a crimped joint. So, the first step was to remove the broken inner aluminum tube. Once removed, re-crimping took very little time.

After that, eating breakfast, repacking everything, and so on, I headed out to Middlesex Fells. I hiked up the hill, set up the three antennas, and started working stations around noon (16:00Z).

I’m not sure what happened, but I think the repair I did on the yagi or something else messed up its pattern. It seemed as if the pattern rotated 20-30 degrees.

I planned to stay about 8 hours—from noon to 8pm (16:00Z–00:00Z), but about half way through the breeze died down enough that the mosquitoes started biting. It was nowhere near as bad as during the hikes at Wells, but enough that by 5pm (17:00Z) I decided to call it quits. I packed up and headed home. On the way home, I realized that I could use my handheld radio to catch a few more FM contacts by going to Robbins Farm Park. It is near home, has good elevation, and overlooks Boston, Cambridge, etc. — in other words, places with people and therefore hams.

I made it up to Robbins Farm Park about an hour later. I called for good 25 minutes before I got a response. The person that got back to me happens to be a new-ish ham. We chatted for about half an hour about antenna building, portable operations, ham radio in general, software (we’re both software developers), and programming languages. After that contact, I decided that I wanted dinner and went home.

Preliminary Results

So, how did I do? I ended up with a score of 832 points. Not great, but not bad either.

In more detail, I…

  • worked in 2 grids (FN32 and FN42)
  • worked 7 unique grids (EL98, FN31, FN32, FN33, FN41, FN42, and FN43)
  • made 49 SSB/FM contacts (3 on 70 cm, 32 on 2 m, and 14 on 6 m)

Improvements For Next Time

I definitely learned quite a bit about about VHF contesting and roving. None of it is ground breaking, and I’ve heard some variant of each of my conclusions before, but I can confirm that they are valid ideas. :)

  1. I should have a beam for every band I plan to use.
  2. I should remember to ask the other person which bands they can use.
  3. I should visit more grids.
  4. I should share the itinerary with people in the area that are interested in the contest.
  5. I should avoid (long) hikes.
  6. I should make antenna setup as fast as possible.
  7. I should use a mast instead of suspending antennas from trees.

The next relevant contest is the CQ World Wide VHF Contest in July. Which means that I have a month to rebuild the 2 m yagi, construct something directional for 6 m that is still easy enough to transport, and figure out a mast. I should also start scoping out locations. Finally, I need to subscribe to some mailing lists so I have a place to announce my intentions.

Results

This section has been added in November 2021. The results for the contests are out.

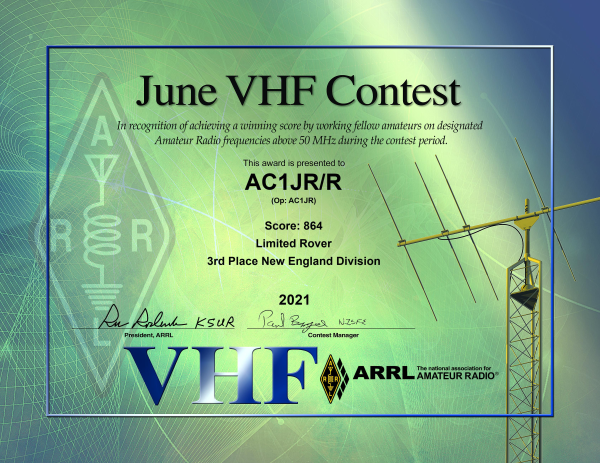
With 864 points, I placed 3rd in the New England division. This sounds impressive, but there were only 4 limited rovers in New England. More impressively, I placed 36th out of 62 limited rovers in all of US.

Powered by blahgd