Josef “Jeff” Sipek

DTrace: qsort use in Firefox, part 2

Earlier, I wrote about some silly qsort behavior in Firefox. I couldn’t help but dig a bit deeper.

Before, we concluded that there were a lot of 8-element, 4-byte element sorts. What are these used for? What part of Firefox is causing these? DTrace to the rescue.

First, let’s change the last DTrace command from last time a bit. First of all, let’s look at 4-byte element invocations only (arg2 equals 4) and let’s aggregate on the caller function name:

# dtrace -n 'pid1120:libc:qsort:entry/arg2==4/{@[ufunc(ucaller)]=llquantize(arg1, 10,0,6,20)} tick-60sec{printa(@)}'

...
  1  75455                      :tick-60sec 
  libnss3.so`DPCache_GetUpToDate                    
           value  ------------- Distribution ------------- count    
             < 1 |@@@@@@@@@@@@@@@@@@@@@@@@@@@@@@@@@@@@@@@@ 14       
               1 |                                         0        

  libglib-2.0.so.0.2501.0`g_array_sort              
           value  ------------- Distribution ------------- count    
             700 |                                         0        
             750 |@@@@@@@@@@@@@@@@@@@@@@@@@@@@@@@@@@@@@@@@ 1        
             800 |                                         0        

  libfontconfig.so.1`FcFontSetSort                  
           value  ------------- Distribution ------------- count    
              55 |                                         0        
              60 |@                                        4        
              65 |                                         2        
              70 |                                         0        
              75 |@@@@                                     20       
              80 |@@@@@                                    24       
              85 |@@@@@@@                                  36       
              90 |@@@@@                                    26       
              95 |                                         0        
             100 |@@@@@@@@@@@@@@                           76       
             150 |@@@@                                     22       
             200 |                                         0        

  libcairo.so.2.10800.10`_cairo_bentley_ottmann_tessellate_bo_edges
           value  ------------- Distribution ------------- count    
               3 |                                         0        
               4 |@                                        59       
               5 |                                         0        
               6 |                                         32       
               7 |                                         0        
               8 |@@@@@@@@@@@@@@@@@@@@@@@@@@@@@            2357     
               9 |                                         0        
              10 |@@                                       137      
              15 |@@@                                      215      
              20 |@                                        52       
              25 |                                         12       
              30 |@                                        58       
              35 |@@                                       200      
              40 |@                                        67       
              45 |                                         3        
              50 |                                         2        
              55 |                                         2        
              60 |                                         7        
              65 |                                         0        
              70 |@                                        67       
              75 |                                         0        
              80 |                                         0        
              85 |                                         0        
              90 |                                         0        
              95 |                                         16       
             100 |                                         0   

We see four unique functions that call qsort. It doesn’t take long to spot the one we were looking for: _cairo_bentley_ottmann_tessellate_bo_edges in libcairo.so. Interesting, so it turns out that it wasn’t Firefox itself doing all these sorts (8-element, 4-byte element) but rather the Cairo graphics library. It would also seem that it is the only place that does these sorts. Let’s see how Firefox is involved in this.

# dtrace -n 'pid1120:libc:qsort:entry/arg2==4 && arg1==8/{@[ustack()]=count()} tick-60sec{printa(@)}'

...
  0  75455                      :tick-60sec 

              libc.so.1`qsort
              libcairo.so.2.10800.10`_cairo_bentley_ottmann_tessellate_bo_edges+0x172
              libcairo.so.2.10800.10`_cairo_bentley_ottmann_tessellate_polygon+0x41f
              libcairo.so.2.10800.10`_cairo_path_fixed_fill_to_traps+0x150
              libcairo.so.2.10800.10`_cairo_clip_clip+0xe3
              libcairo.so.2.10800.10`_cairo_gstate_clip+0x44
              libcairo.so.2.10800.10`cairo_clip_preserve+0x31
              libxul.so`__1cKgfxContextEClip6M_v_+0x24
              libxul.so`__1cInsWindowNOnExposeEvent6MpnK_GtkWidget_pnP_GdkEventExpose__i_+0x56e
              libxul.so`__1cPexpose_event_cb6FpnK_GtkWidget_pnP_GdkEventExpose__i_+0x72
              libgtk-x11-2.0.so.0.2000.0`_gtk_marshal_BOOLEAN__BOXED+0x7b
              libgobject-2.0.so.0.2501.0`g_closure_invoke+0xdf
              libgobject-2.0.so.0.2501.0`signal_emit_unlocked_R+0x9f2
              libgobject-2.0.so.0.2501.0`g_signal_emit_valist+0x6d2
              libgobject-2.0.so.0.2501.0`g_signal_emit+0x28
              libgtk-x11-2.0.so.0.2000.0`gtk_widget_event_internal+0x24d
              libgtk-x11-2.0.so.0.2000.0`gtk_widget_send_expose+0x98
              libgtk-x11-2.0.so.0.2000.0`gtk_main_do_event+0x46f
              libgdk-x11-2.0.so.0.2000.0`_gdk_window_process_updates_recurse+0x291
              libgdk-x11-2.0.so.0.2000.0`_gdk_windowing_window_process_updates_recurse+0x24
              184

This counts the number of 4-byte element, 8-element arrays qsort aggregated on the stack trace. We get to use ustack() here because we are in userspace (stack() would give us the kernel stack trace). Where is Firefox in this mess? libxul.so. This is the limit of my knowledge of Firefox internals and someone more knowledgeable could tell you more.

Your Turn

Do you use DTrace? Do you have some interesting war stories? Let me know in the comments!

DTrace: qsort use in Firefox

I’ve talked about OpenIndiana a bunch. I’ve mentioned several of its features. Let me tell you about my Wikipedia article: DTrace experiments from today. Inspired by Wikipedia article: Con Kolivas, I decided to see how Firefox uses the qsort C function.

First things first, let’s look at what the function signature looks like.

void qsort(void *base, size_t nel, size_t width,
           int (*compar)(const void *, const void *));

The second argument contains the number of elements.

Now, let’s take a look at DTrace. We want the pid provider, which lets us instrument a specific process. In my case, Firefox was pid 1069. pid1069:libc:qsort:entry is the name of the probe that will fire every time qsort in libc.so is called by Firefox (pid 1069). Let’s aggregate the second argument (the number of elements). To keep things sane, I used the llquantize function. It is a log-linear quantization function that was rather well explained by Bryan Cantrill. (Base 10 with buckets between zero and one million seemed reasonable enough.) Additionally, I wanted DTrace to give me the current histogram every minute — that’s why there is the tick-60sec probe.

# dtrace -n 'pid1069:libc:qsort:entry{@=llquantize(arg1, 10,0,6,20)} tick-60sec{printa(@)}'

...
  1  78738                      :tick-60sec 

           value  ------------- Distribution ------------- count    
             < 1 |                                         2        
               1 |                                         0        
               2 |                                         21       
               3 |                                         2        
               4 |@@@@                                     365      
               5 |                                         1        
               6 |@                                        132      
               7 |                                         0        
               8 |@@@@@@@@@@@@@@@@@@@@@                    1923     
               9 |                                         0        
              10 |@                                        135      
              15 |@@                                       194      
              20 |@                                        134      
              25 |                                         9        
              30 |@@@                                      246      
              35 |                                         31       
              40 |                                         8        
              45 |                                         0        
              50 |                                         0        
              55 |                                         10       
              60 |                                         1        
              65 |                                         10       
              70 |                                         39       
              75 |                                         2        
              80 |@                                        112      
              85 |@                                        56       
              90 |@                                        82       
              95 |                                         1        
             100 |@                                        132      
             150 |@                                        90       
             200 |                                         0        
             250 |                                         0        
             300 |                                         4        
             350 |                                         0        

Interesting! After several minutes of browsing various websites, we can see that Firefox really likes to sort 8-element arrays. (The value column is the bucket for the various array lengths. The count column specifies how many times there was a qsort call for each bucket.) Let’s dig a little deeper. Sorting 1 byte array elements is very different from sorting 1 MB elements. It would be really nice if we could break the histogram down into several histograms — one for each size. Well, guess what? DTrace lets you do that very easily.

Note that the command changed only a little. Now, in addition to looking at the second argument (the array length), DTrace breaks down the distribution based on the value of the third argument (the array element size). Since I visited different websites and Firefox does caching, the distribution of qsorts is a bit different — but it is still close enough.

# dtrace -n 'pid1069:libc:qsort:entry{@[arg2]=llquantize(arg1, 10,0,6,20)} tick-60sec{printa(@)}'

...
  4  78738                      :tick-60sec 
               52
           value  ------------- Distribution ------------- count    
               1 |                                         0        
               2 |@@@@@@@@@@@@@@@@@                        60       
               3 |@@                                       9        
               4 |@@@@@                                    17       
               5 |                                         0        
               6 |@@@@@@@@@@@@@@@                          55       
               7 |                                         0        
               8 |@                                        3        
               9 |                                         1        
              10 |                                         0        

                8
           value  ------------- Distribution ------------- count    
             < 1 |@@@@@@@@@@@@@                            2        
               1 |                                         0        
               2 |                                         0        
               3 |                                         0        
               4 |                                         0        
               5 |                                         0        
               6 |                                         0        
               7 |                                         0        
               8 |                                         0        
               9 |                                         0        
              10 |                                         0        
              15 |                                         0        
              20 |                                         0        
              25 |                                         0        
              30 |                                         0        
              35 |                                         0        
              40 |                                         0        
              45 |                                         0        
              50 |                                         0        
              55 |                                         0        
              60 |                                         0        
              65 |                                         0        
              70 |                                         0        
              75 |                                         0        
              80 |                                         0        
              85 |                                         0        
              90 |                                         0        
              95 |                                         0        
             100 |                                         0        
             150 |                                         0        
             200 |@@@@@@@@@@@@@@@@@@@@                     3        
             250 |                                         0        
             300 |@@@@@@@                                  1        
             350 |                                         0        

                4
           value  ------------- Distribution ------------- count    
             < 1 |                                         12       
               1 |                                         0        
               2 |                                         1        
               3 |                                         0        
               4 |@@@@@@@                                  1351     
               5 |                                         0        
               6 |@                                        247      
               7 |                                         0        
               8 |@@@@@@@@@                                1868     
               9 |                                         0        
              10 |@@@                                      594      
              15 |@@                                       422      
              20 |@                                        230      
              25 |                                         4        
              30 |@@@@@@                                   1193     
              35 |@@                                       466      
              40 |                                         57       
              45 |                                         63       
              50 |                                         1        
              55 |                                         18       
              60 |@                                        190      
              65 |@@                                       341      
              70 |@                                        207      
              75 |                                         2        
              80 |                                         56       
              85 |@                                        158      
              90 |                                         46       
              95 |                                         0        
             100 |@@                                       350      
             150 |@                                        206      
             200 |                                         3        
             250 |                                         10       
             300 |                                         8        
             350 |                                         0        
             400 |                                         0        
             450 |                                         0        
             500 |                                         0        
             550 |                                         0        
             600 |                                         0        
             650 |                                         0        
             700 |                                         1        
             750 |                                         10       
             800 |                                         0        
             850 |                                         0        
             900 |                                         0        
             950 |                                         0        
            1000 |                                         0        
            1500 |                                         0        
            2000 |                                         0        
            2500 |                                         0        
            3000 |                                         8        
            3500 |                                         0        

As you can see, there are now three histograms printed — that’s because DTrace saw 3 unique values of arg2. The first histogram is for 52-byte array element sorts. There weren’t many of those over the few minutes of browsing I did. The second is for 8-bytes elements — there are six of those total! The third distribution is where things get interesting. These are all the sorts of 4-byte array elements. Now we know that the large amount of 8-element sorts Firefox performs are on 4-byte element arrays. I wonder what that’s about. We also see that there were eight times that Firefox ended up sorting an array that had somewhere between 3000 and 3500 4-byte elements. Eeek!

DTrace is a really powerful tool. It lets you inspect the operation of a system with minimal disruption (the performance overhead is rather small). I hope to post more analyses of various software in the future.

I should add, this experiment was conducted with Firefox 3.6.12 on OpenIndiana 151a.

OpenIndiana The What and Why

You have seen me publish two posts about OpenIndiana, but neither of them really says what it is and why you should use it.

The What

OpenIndiana started off as a fork of OpenSolaris. At first, its aim was to provide an alternative to Oracle’s soon-to-be-released Solaris 11, but lately its aim shifted to “an enterprise-quality OS alternative to Linux.”

OpenIndiana is much like a distro in the Linux world. It relies on the Illumos project for the kernel and basic userspace utilities (the shell, etc.). In September 2010, Illumos forked the OpenSolaris kernel and utilities, and OpenIndiana forked the surrounding userspace (the build system for all the packages that make the system usable).

The Why

It is the technology that is the reason I started using OI. Here are some of the features that either drew me in to try OI, or made me stay.

Crossbow
Crossbow was the name of the project that consisted of a major revamp of the network stack. With this revamp (which was available in OpenSolaris), you can create virtual network interfaces, vlans, bridges, switches (called etherstubs), as well as aggregate links with simple commands — quickly, and all the configuration is persistent. You can dedicate both physical and virtual links to zones (see below) to create entire network topologies within one computer. (see dladm(1M) and ipdam(1M))
Zones
These days, everyone is happily setting up virtual machines whenever they need an environment they can tweak without affecting stability of other services. Solaris zones are a great virtualization technology. They allow you to set up multiple Solaris instances (called zones) that have a separate root filesystem (much like chroot). Unlike chrooted environments, having root access in a zone does not give you unrestricted access to the kernel. Zones combined with crossbow is a great combination to consolidate separate systems onto a single Solaris host. (I am currently writing a post about using zones and crossbow on a home server/router.)
Boot Environments (BE) & IPS
Long story short, if the package manager (IPS) detects that a potentially major change is going to occur during an update (e.g., a driver or kernel upgrade), it clones the current root filesystem (easy to do thanks to ZFS) and applies the updates there. It then adds a menu entry to grub to boot into this new environment. The current environment is unchanged. At your leisure, you just reboot into the new environment. If everything works — great. If, however, things break, you can just reboot into the previous BE, and mount the new BE’s root and fix things up. This means that the only downtime the system sees is the reboot or two.
ZFS
There’s plenty of ZFS discussion elsewhere. My favorite features about it are (in no particular order): snapshots, deduplication, integrated volume management, and checksumming.

So there you have it. Sure, many of Solaris’s features are available in some shape or form on Linux, but they tend to be either horribly crippled, or if you are “lucky,” lacking sane management interface.

If you want to see what all this fuss is about, I suggest you grab the Live DVD (or Live USB) image on the download page and give it a try.

Meili

Back in June I got myself a new laptop — Thinkpad T520. As always, it’s a solid design (yes, I know, Thinkpads aren’t what they used to be). The unfortunate news is that the hardware was just a bit too new to be supported well. It came with Windows 7, which of course knew how to deal with all the devices in the system.

Debian

I tried installing Debian, but anything but the latest testing snapshot didn’t recognize my Intel 82579LM ethernet chip. The latest development snapshot installed just fine, but when I tried to boot into the installed system, everything got stuck in the middle of the initramfs. Booting with init=/bin/bash got me a shell, but anything and everything I tried didn’t fix the problem in the end. I searched the bug tracker for similar issues — no luck. In a last ditch effort, I tried to ask #debian. In has been my experience in the past that this channel is useless, but I asked anyway. I got precisely zero responses.

OpenIndiana

Unlike Debian, OpenIndiana installed and booted just fine. Sadly, both my wifi (Intel Wifi Link 1000) and my wired ethernet were not supported. I ended up installing VirtualBox in Windows and OpenIndiana underneath it. It worked reasonably well. At the same time, I started pestering some of the Illumos developers that mentioned that they were working on an update to the e1000g driver — the driver for my wired network interface.

Yesterday, one of them updated the bug related to the driver update with binaries for people to try. Well, guess what? I’m writing this entry in Vim over ssh.

The driver install was a simple matter of overwriting the existing e1000g files, and then running update_drv -a -i ’"pci8086,1502"’ e1000g and then rebooting. (I could have used devfsadm instead, but I wanted to make sure things would come up on boot anyway.)

I still need to switch Xorg to the proprietary NVidia driver.

Windows

I’m pretty sure I’ll end up rebooting into Windows every so often anyway…if only to play Wikipedia article: Age of Mythology. :)

P.S. In case you haven’t guessed it yet, Meili is my laptop’s hostname.

OpenIndiana (build 151a)

Over the past few months, I’ve played with Solaris — specifically, OpenIndiana, or OI for short. OI is a fork of OpenSolaris. OI’s first release happened on September 14, 2010. Today, exactly a year later, the OI community is proud to annouce the release of build 151a. The release notes say it all.

Personally, I find the KVM port to Illumos (the project that forked the core libs, programs, and OpenSolaris kernel) the most interesting. It’ll let me run (and manage!) virtual machines a bit more easily than what I get with VirtualBox. (Since OI now uses Illumos as the core Solaris upstream, it benefits from all the great work done by companies and individuals that contribute to Illumos.)

In case you are a bit confused, OI aims to be the defacto community Solaris distribution.

Oh, I almost forgot… 151a includes a package with Guilt (developer/versioning/guilt). :)

CMake

Recently, I looked into various build system in hopes of finding one that sucks less than the custom built (not by me) one I had the “pleasure” of dealing with for about a month. The requirements were that it had to work on Windows, Linux, and Mac OS X. Of all the possibilities, CMake looked really promising. After successfully convincing the others that CMake was better for the project, most of the code got switched over. I have to say, CMake is nice.

Since then, I have replaced Makefiles in several of my projects (e.g., my blogging system) with CMakeLists.txt. Not only is the console output cleaner, but it does proper dependencies, some sanity checks, and in general simplifies one’s life. I am actually considering switching HVF build system to it.

Gentoo's --as-needed insanity

I feel a bit ranty.

Recently, I got to make an ebuild file (this is Gentoo’s equivalent of RPM spec file) for PCP. The ebuild file is pretty simple to make — the only trickiness was PCP’s little strange makefile setup (the makefile runs configure which makes another makefile that the original makefile includes). This was pretty easy to work with anyway.

The issue I spent about a day and a half on was Gentoo’s idea of making better executables … the –as-needed flag. The idea behind this flag is to only link in the libraries that are actually needed (have symbols referenced) and ignore the rest. This sounds great at first, but then you run into an issue where you want to build a Perl module but instead you end up with a shared object which Perl won’t load because of unresolved references. I don’t know how exacly Perl does its magic, but –as-needed was not linking the Perl module against libpcp.

Part of the fix was to add a bunch of filters in the pkg_setup hook:

        append-flags $(no-as-needed)
        filter-flags -Wl,--as-needed
        filter-ldflags -Wl,--as-needed
        filter-ldflags --as-needed
        append-ldflags $(no-as-needed)

Additionally, I had to modify a src/cpan/PMDA/Makefile.PL to disable this insanity in the Perl-invoked builds.

Performance Co-Pilot Podcast @ RCE

The folks at RCE did a podcast with Ken McDonell (of the PCP fame) about PCP.

Long story short, here’s the link to RCE 53: Performance Co-Pilot.

Performance Co-Pilot: Part 2, Enabling PMDAs

In my previous post, I introduced Performance Co-Pilot (PCP). I know, I promised the next post to be about logging, but I thought I’d make a short detour and show how to install more PMDAs.

After installing PCP on a Linux system, you will have access to somewhere around 850 various metrics from the three basic PMDAs (pmcd, linux, and mmv). There are many more metrics that you can get at if you enable some of the non-default PMDAs.

I pondered what the best way to present a simple howto would be, and then I realized that simply copying & pasting a session where I install a PMDA will do.

First of all, all the PMDAs live in /var/lib/pcp/pmdas/.

# cd /var/lib/pcp/pmdas/
# ls
apache	 gpsd	    lustrecomm	mounts	   news     process   sendmail	systemtap  vmware
bonding  kvm	    mailq	mysql	   pdns     roomtemp  shping	trace	   weblog
cisco	 linux	    memcache	named	   pmcd     samba     simple	trivial    zimbra
dbping	 lmsensors  mmv		netfilter  postfix  sample    summary	txmon

In this post, I will use the PowerDNS PMDA as an example, but the steps are the same for the other PMDAs.

# cd pdns/
# ls
Install  Remove  pmdapdns.pl

As you can see, there are three files in this directory. We are interested in the Install script. Simply run it as root, and when it asks whether you want a collector, a monitor, or both answer appropriately — if you are running the daemon on the same host, answering both is your best bet. (I never had the need to answer anything else.)

# ./Install 
You will need to choose an appropriate configuration for installation of
the "pdns" Performance Metrics Domain Agent (PMDA).

  collector	collect performance statistics on this system
  monitor	allow this system to monitor local and/or remote systems
  both		collector and monitor configuration for this system

Please enter c(ollector) or m(onitor) or b(oth) [b] 
Updating the Performance Metrics Name Space (PMNS) ...
Compiled PMNS contains
	  197 hash table entries
	  847 leaf nodes
	  132 non-leaf nodes
	 8149 bytes of symbol table
Terminate PMDA if already installed ...
Updating the PMCD control file, and notifying PMCD ...
Check pdns metrics have appeared ... 22 warnings, 60 metrics and 42 values

At this point, the PMDA has been installed (take a look at /etc/pmcd/pmcd.conf to see the new config line there enabling the new PMDA). Now, we can see the new metrics using pminfo (there are many more, I just pruned the list for brevity):

# pminfo pdns
pdns.packetcache_hit
pdns.tcp_answers
pdns.packetcache_miss

We are done!

If you decide to uninstall a PMDA, just cd into the directory and run the Remove script.

Performance Co-Pilot: Part 1, Introduction

I decided to write a series of posts about one piece of software — Performance Co-Pilot, or PCP for short. (I am aware that the project webpage isn’t the greatest, but don’t let that make you ignore a great piece of software.)

What is PCP

First of all, what is PCP? Let me start by quoting a bit from the PCP webpage:

Performance Co-Pilot (PCP) provides a framework and services to support system-level performance monitoring and management. It presents a unifying abstraction for all of the performance data in a system, and many tools for interrogating, retrieving and processing that data.

If you ever administered a server, you know that there are times when you want to know answers to pretty simple questions: what’s the load average on server X, or what’s the current network utilization on server Y, or memory usage, number of processes, number of logged in users, disk bandwidth usage, filesystem usage, etc., etc. You may have written some scripts that try to answer those questions, or used some of the other monitoring frameworks out there (e.g., Ganglia, Cacti). PCP is rather unique in the way it handles monitoring.

PCP architecture

PCP has a three major parts:

PMDAs
PMDAs (short for Performance Metrics Domain Agents) are metric collectors. Each PMDA knows how to retrieve certain system information. For example, the Linux PMDA knows how to parse all the information in /proc, the PowerDNS PMDA knows how to get statistics from the PowerDNS daemons, the MySQL PMDA knows how to get stats from MySQL, etc. There are 35 different PMDAs installed that cover various often used daemons and system services — Apache, KVM, lmsensors, memcached, MySQL, Bind, PowerDNS, Postfix, Samba, Sendmail, VmWare, Zimbra, and more.
PMCD
PMCD (short for Performance Metric Collector Daemon) is responsible for answering client (see below) requests for metrics, and calls into the various PMDAs to retrieve the requested metrics.
client software
The various pieces of client software contact the PMCD (via TCP/IP) and request one or more metrics.

Why not use Ganglia/Cacti/other rrdtool-based software?

As is stated on the rrdtool website, rrdtool is a high performance data logging and graphing system for time series data. So, why not use it? First of all, rrdtool doesn’t collect data; it merely stores it for later retrieval or graphing. This means that if you want to collect data, you still need something to collect it with — a script that parses /proc files and hands the values to rrdtool for storage.

Cacti and Ganglia are just two examples of the many rrdtool-based system logging solutions. Personally, I find them to be a bit too heavy weight (why do I want PHP and MySQL on my logger server?), cumbersome to use (e.g., clunky web interfaces), and just not flexible enough.

Additionally, PCP supports Linux, Solaris, Mac OS X, and even Microsoft Windows. You can use the same tools to monitor your entire network!

Why not use SNMP?

SNMP is a protocol that exposes a hierarchy of variables that often include some performance metrics (e.g., the number of bytes and packets transfered over a network interface). If, however, you want MySQL statistics, you need to write your own stat extractor that feeds it into the SNMP daemon — not very hard, but it still takes some effort.

In this series of posts, I hope to demonstrate to you that PCP is superior to these solutions.

Installation

Debian is my distro of choice, so I’m going to make some Debian-centric assumptions.

On Debian, PCP is packaged so installing it is as easy as:

# aptitude install pcp pcp-gui

Distros that are Debian derivatives (e.g., Ubuntu) should have a package as well. Fedora, RHEL, and SLES have packages as well.

At the end of installation, the Debian package automatically starts the PMCD.

At this point, we only care about the Linux PMDA. By default, anyone that can make a TCP/IP connection to the host can read and write the metrics. (The PMCD has a couple of “metrics” that can be changed — they affect how PMCD behaves.) My suggestion is to set up an access control list. This is what the default config file (/etc/pmcd/pmcd.conf) looks like:

# Performance Metrics Domain Specifications
# 
# This file is automatically generated during the build
# Name  Id      IPC     IPC Params      File/Cmd
pmcd	2	dso	pmcd_init	/var/lib/pcp/pmdas/pmcd/pmda_pmcd.so
linux	60	dso	linux_init	/var/lib/pcp/pmdas/linux/pmda_linux.so
mmv	70	dso	mmv_init	/var/lib/pcp/pmdas/mmv/pmda_mmv.so

PMCD allows for a simple access control list in the config file (/etc/pmcd/pmcd.conf), and it would be a good idea to set one up to allow only specific hosts to access it. Here’s an example of what the new config file would look like:

# Performance Metrics Domain Specifications
# 
# This file is automatically generated during the build
# Name  Id      IPC     IPC Params      File/Cmd
pmcd	2	dso	pmcd_init	/var/lib/pcp/pmdas/pmcd/pmda_pmcd.so
linux	60	dso	linux_init	/var/lib/pcp/pmdas/linux/pmda_linux.so
mmv	70	dso	mmv_init	/var/lib/pcp/pmdas/mmv/pmda_mmv.so

[access]
allow localhost, 127.0.0.1 : all;
allow 10.1.*, 10.2.* : fetch;
allow home.josefsipek.net : all;
disallow * : all;

It allows reads and writes from localhost and home.josefsipek.net, and only reads from 10.1.* and 10.2.*. You’ll have to restart PCP for the change to take place:

# /etc/init.d/pcp restart

First Test

Now that we have PCP installed and running, let’s query it for the list of metrics. We’ll use the pminfo utility. By default it assumes that we want to query the localhost.

$ pminfo

If you want to query another host, you can specify its name or IP using the -h argument. For example,

$ pminfo -h example.com

On my system it spits out 851 different metrics. Here’s a pruned list that includes the more interesting ones:

kernel.all.nusers
kernel.all.load
kernel.all.cpu.user
kernel.all.cpu.sys
kernel.all.cpu.idle
kernel.percpu.cpu.user
mem.physmem
mem.freemem
network.interface.in.bytes
network.interface.out.bytes
disk.dev.read_bytes
disk.dev.write_bytes
filesys.capacity
filesys.used
proc.nprocs
proc.psinfo.cmd

We can use the -f argument to fetch the current value, and for simplicity, let’s specify the specific metric we are interested in:

$ pminfo -f kernel.all.nusers 

kernel.all.nusers
    value 2

So, at the moment, there are two users logged in. Now, let’s check the load average:

$ pminfo -f kernel.all.load 

kernel.all.load
    inst [1 or "1 minute"] value 0.0099999998
    inst [5 or "5 minute"] value 0.02
    inst [15 or "15 minute"] value 0

We can see that pminfo returned 3 values — called instances in PCP speak.

I should note that some of the metric values don’t seem to make much sense unless you already know what they represent. Have no fear! pminfo has two arguments that display a short (-t) or a long (-T) help text. For example, the following command will tell us what what kernel.all.load keeps track of.

pminfo -T kernel.all.load

You can use pminfo to fetch all the metrics you want, or you can use one of the other utilities which do some additional magic.

pmdumptext is one such utility. Suppose we want to watch how the disk utilization changes over time. Here’s the command:

$ pmdumptext -mu disk.dev.read_bytes
Time	disk.dev.read_bytes["sda"]	disk.dev.read_bytes["hda"]
none	Kbyte / second	Kbyte / second
Fri Apr  1 16:15:36	?	?
Fri Apr  1 16:15:37	0.000	0.000
Fri Apr  1 16:15:38	248.003	0.000
Fri Apr  1 16:15:39	1748.117	0.000
Fri Apr  1 16:15:40	543.985	0.000
Fri Apr  1 16:15:41	536.041	0.000
Fri Apr  1 16:15:42	331.968	0.000
Fri Apr  1 16:15:43	2299.862	0.000
Fri Apr  1 16:15:44	6112.226	0.000
Fri Apr  1 16:15:45	8187.725	0.000
Fri Apr  1 16:15:46	1212.029	0.000
Fri Apr  1 16:15:47	84.002	0.000
Fri Apr  1 16:15:48	143.990	0.000
Fri Apr  1 16:15:49	963.538	0.000
Fri Apr  1 16:15:50	64.003	0.000
Fri Apr  1 16:15:51	0.000	0.000
Fri Apr  1 16:15:52	0.000	0.000

The first column contains the date and time, the remaining column are the time-converted metrics/instances. That is, between each line of output, PCP calculated the average utilization and printed that out. The arguments (-m and -u) print the first two lines of the output — the name of the metric/instance, and the units. pmdumptext gets the units from the PMCD along with information whether or not it should rate convert the values (it will rate convert “bytes” to “bytes/sec”, but if there is a metric representing the current latency it will leave it alone).

You can change the amount of time between updates with the -t option. As before, you can use -h to specify the hostname. For example:

pmdumptext -mu -t 15sec -h example.com disk.dev.read_bytes

GUI

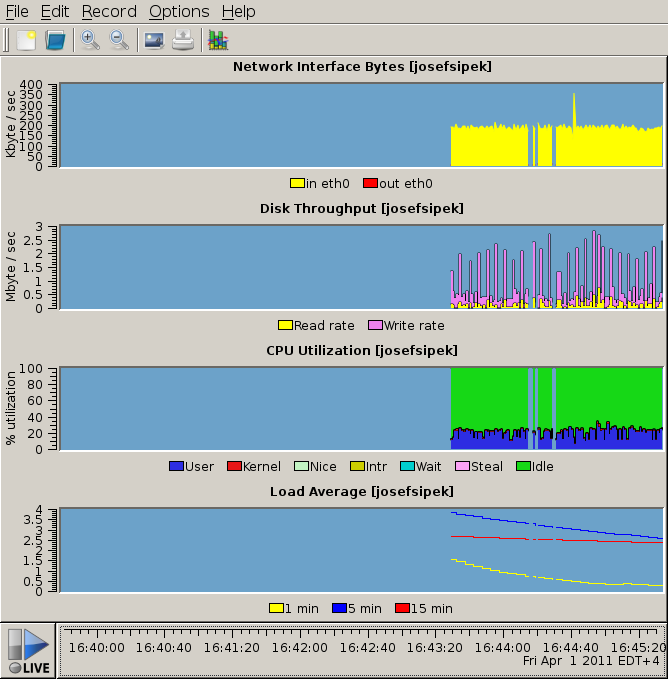
pmdumptext is great, but sometimes you want something more…graphical. Again, there’s a program for that. It’s called pmchart. It’s pretty self-explanatory, so I’ll just show you a screenshot of it in action:

pmchart in action

Next time, I’ll cover PCP’s logging facility.

Powered by blahgd